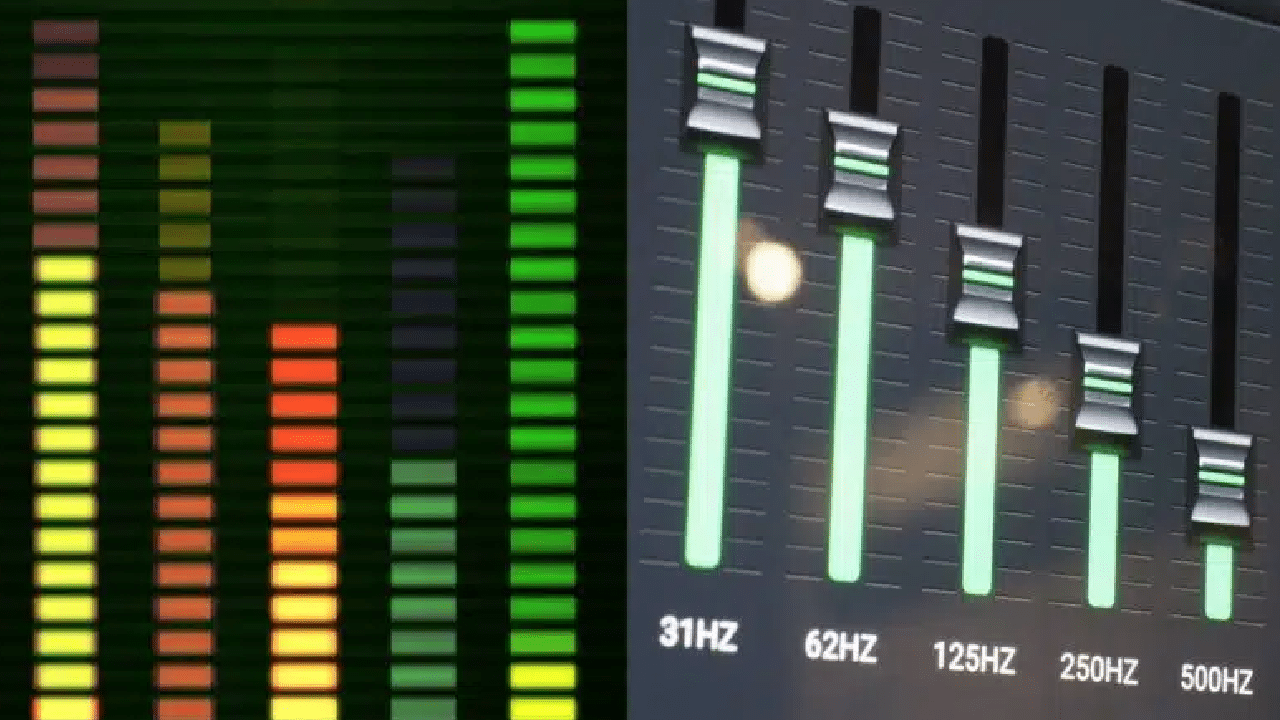
Spotify provides an equalizer feature that allows you to adjust the audio settings to suit your preferences and enhance the listening experience on your AirPods or AirPods Pro.
In this guide, we will walk you through the steps to enable the equalizer on Spotify and provide recommended EQ settings for different music genres.
Before we dive into genre-specific EQ settings, let’s cover some key concepts and terms related to EQ:
Frequency Bands:
EQ works by manipulating different frequency bands, which represent specific ranges of audio frequencies. Common frequency bands include bass (low frequencies), midrange (middle frequencies), and treble (high frequencies). Each genre has unique characteristics and tonal balance requirements within these bands.
Center Frequency:
Each frequency band has a center frequency, which is the specific point within the band that you can boost or cut. For example, in the bass band, the center frequency might be around 80Hz.
Boost and Cut:
EQ allows you to increase (boost) or decrease (cut) the level of specific frequencies. Boosting a frequency adds emphasis, while cutting reduces its prominence in the mix.
Please note that these settings are subjective, and you can always customize them further based on your personal taste.
Enabling the Equalizer on Spotify:
Open Spotify:
Launch the Spotify application on your device and make sure you are logged in.
Access the Equalizer:
In the Spotify app, go to the “Home” tab and tap on the gear icon in the top-right corner to access the settings menu. Scroll down and select the “Playback” option.
Enable the Equalizer:
In the “Playback” settings, you’ll find the “Equalizer” option. Tap on it to enable the equalizer functionality.
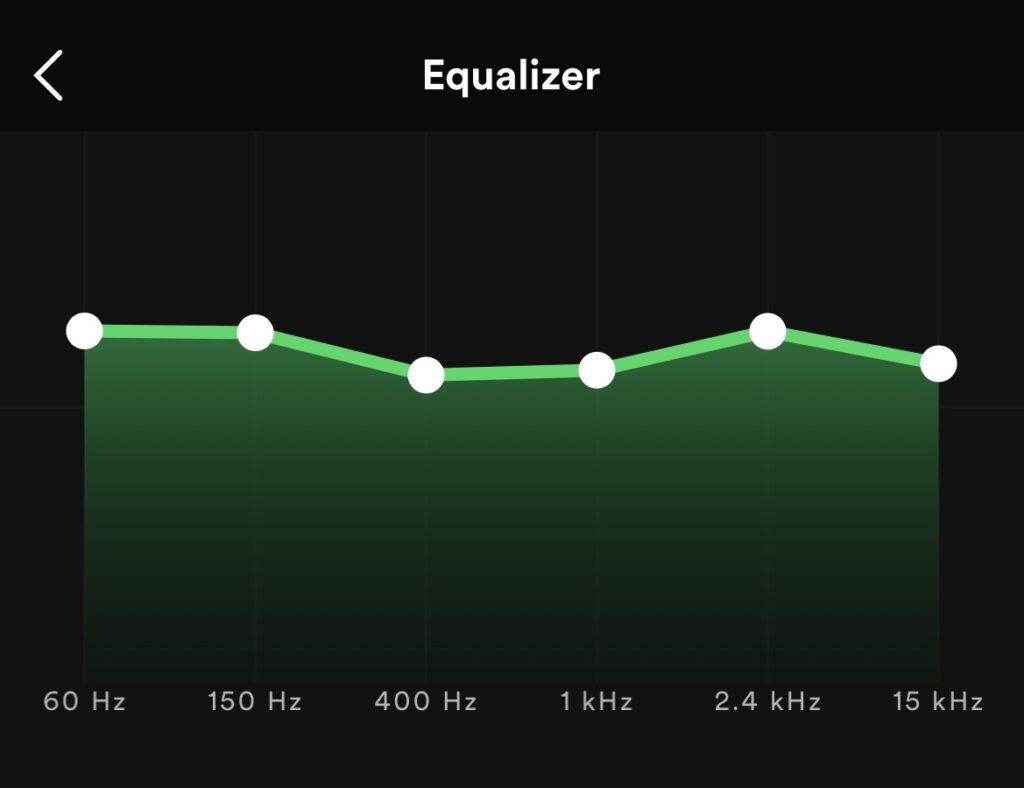
Adjust the Frequency Levels:
Once the equalizer is enabled, you’ll see a set of frequency bands represented by nodes on a graph. The available frequencies you can adjust are set at 60Hz, 150Hz, 400Hz, 1kHz, 2.4kHz, and 15kHz. You won’t be able to change the Q size or move around frequencies like in a standard EQ plugin.
Drag the Nodes:
To modify the frequency levels, simply drag the nodes up or down. Moving a node upwards will boost the corresponding frequency, while moving it downwards will cut or reduce it. You can experiment with different levels to find the desired sound.
Audition and Compare:
As you adjust the frequency levels, you can listen to a track simultaneously to hear how the equalizer affects the music. You can quickly switch the equalizer on and off to compare the difference it makes.
Apply EQ to Podcasts (Optional):
Spotify also allows you to choose whether or not to apply the equalizer to podcasts. This can be helpful if your EQ settings include a lot of bass and you want to optimize your listening experience for spoken word content.
Explore Equalizer Presets:
If you’re unsure where to start or prefer a quick setup, Spotify provides a selection of equalizer presets. These presets are tailored for specific genres like Pop, Rock, and Hip-Hop, and also include options for increasing loudness, bass booster, vocal boosts, listening on small speakers, and spoken word. You can browse through the presets to find one that suits your listening setup.
Real-Time Settings:
When you select an equalizer preset or adjust the frequency levels manually, you’ll see the settings change in real-time.
For example, choosing the “Bass Booster” preset will increase the top end, resulting in a more prominent bass sound.
Best Spotify Equalizer Settings for AirPods:
Now, let’s embark on a musical journey through various equalizer presets tailor-made to suit your tastes. Brace yourself for a symphony of emotions!
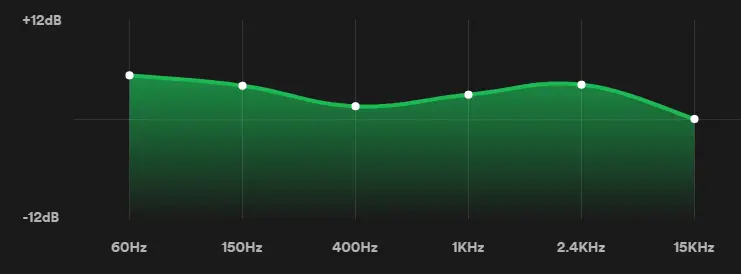
Bass Booster EQ Settings:
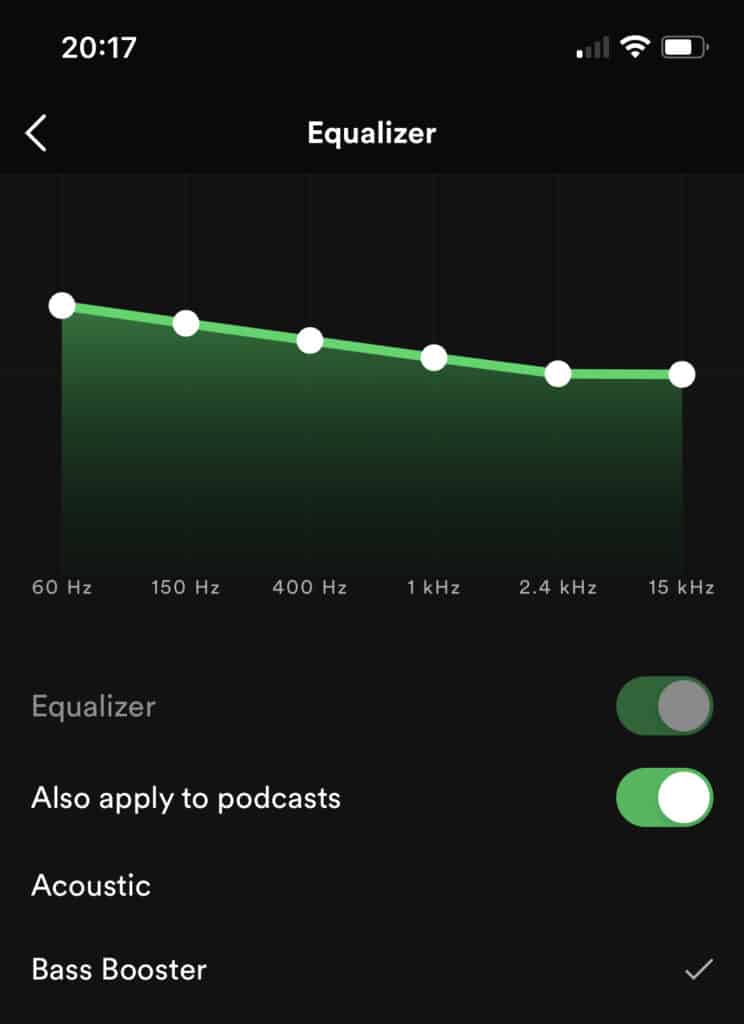
Do you crave those deep, resonating bass lines that make your heart skip a beat? This setting is a bass lover’s dream come true.
It elevates the low frequencies, injecting your music with a powerful thump that will have you moving and grooving.
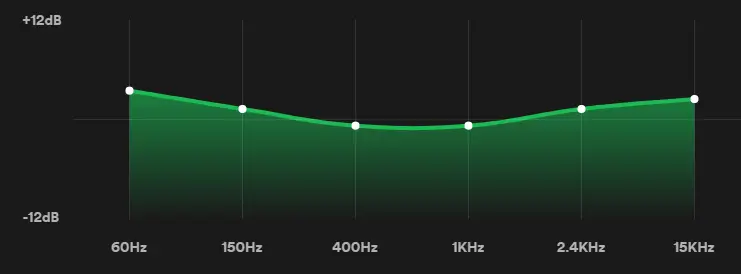
Vocal Booster EQ Settings:
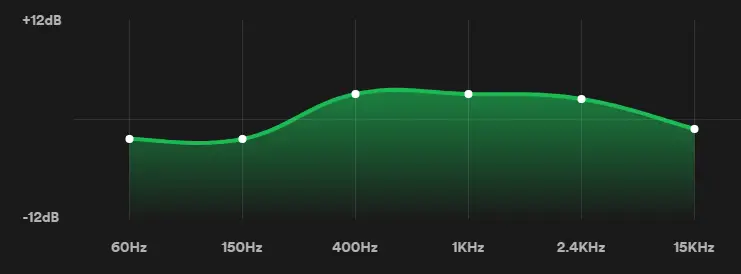
Are you a fan of crisp, crystal-clear vocals that give you goosebumps? Look no further!
This setting emphasizes the treble frequencies, bringing out the finest details in every lyric and harmonious note.
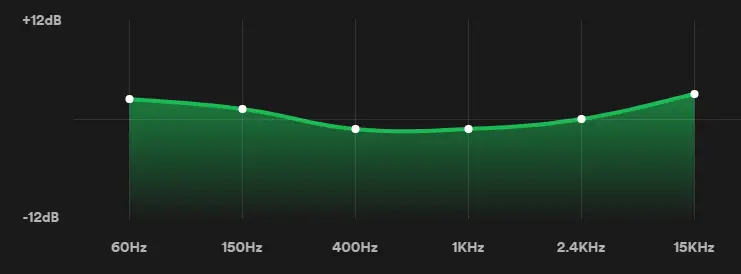
Classical EQ Settings:

Do you find solace in the elegant melodies of classical music?
This preset is a symphony in itself. It enriches the instruments while subtly reducing the prominence of male vocals, allowing you to immerse yourself in the magic of symphonies and harmonies.
Dance EQ Settings
This setting is designed to make you feel the energy and excitement of dance music.
By emphasizing the treble frequencies, especially female vocals and string instruments, it transports you to a world of non-stop beats and infectious melodies.
Hip-Hop EQ Settings:
When you’re in the mood for some hip-hop swagger, this preset will be your ultimate companion.
It enhances the overall hip-hop experience by emphasizing the unique characteristics of the genre, making each beat and rap verse shine
Pop, Jazz, Rock, and Acoustic EQ Settings:
A detailed overview of EQ settings for four popular music genres: Pop, Jazz, Rock, and Acoustic. The information presented here has been thoroughly researched and is based on reliable sources.
Pop EQ Settings:

Pop music generally aims for a polished and radio-friendly sound with emphasis on vocals, catchy melodies, and a balanced mix. Here are some typical EQ settings used in pop music production:
Vocals: Boost the presence or upper midrange frequencies (around 2 kHz to 5 kHz) to enhance clarity and intelligibility. Cut any harsh frequencies (typically around 3 kHz to 6 kHz) to reduce sibilance or harshness.
Bass: Boost the low-end frequencies (around 60 Hz to 120 Hz) to add warmth and depth. Cut any muddiness or excessive low frequencies that may interfere with other instruments or vocals.
Guitars and Keyboards: Depending on the specific sound, adjust EQ settings to emphasize the desired frequency range. For example, for electric guitars, a slight boost in the upper midrange frequencies (around 1 kHz to 4 kHz) can add presence and bite.
Jazz EQ Settings:
Jazz music encompasses a wide range of styles, from smooth and mellow to upbeat and energetic. The following EQ settings are commonly used in jazz music production:
Piano: Boost the midrange frequencies (around 500 Hz to 1 kHz) to enhance the piano’s natural warmth and resonance. Cut any excessive low frequencies or rumble that can muddy the sound.
Brass Instruments: Enhance the presence and brilliance of brass instruments by gently boosting the upper midrange frequencies (around 2 kHz to 5 kHz). Cut any harshness or excessive brightness.
Double Bass: Boost the low frequencies (around 60 Hz to 200 Hz) to reinforce the instrument’s rich and full-bodied sound. Cut any rumble or unnecessary low-end frequencies.
Rock EQ Settings

Rock music is characterized by its powerful instrumentation, energetic performances, and aggressive sound. Consider the following EQ settings commonly used in rock music production:
Electric Guitar: Boost the upper midrange frequencies (around 1 kHz to 3 kHz) to add bite and presence to the guitar sound. Cut any muddiness or excessive low frequencies.
Drums: Enhance the attack and punch of drums by boosting the higher frequencies (around 3 kHz to 5 kHz). Cut any unwanted resonances or harshness.
Vocals: Depending on the vocalist’s tone, adjust the EQ settings to emphasize clarity and intelligibility. Boost the presence frequencies (around 2 kHz to 6 kHz) while cutting any harshness or nasal frequencies.
Acoustic EQ Settings

Acoustic music focuses on natural and unamplified sounds, often featuring acoustic instruments and vocals. Here are some common EQ settings used in acoustic music production:
Acoustic Guitar: Enhance the warmth and body of the guitar by gently boosting the low frequencies (around 80 Hz to 200 Hz). Cut any excessive low-end rumble or boominess.
Vocals: Emphasize the natural qualities of the voice by boosting the midrange frequencies (around 1 kHz to 4 kHz). Cut any unwanted resonances or boxiness.
Other Acoustic Instruments: Adjust the EQ settings based on the specific instrument to enhance its natural characteristics. F
Loudness and Spoken Word Presets:
Spotify also offers two specialized presets for different purposes:
Loudness:

If you want your tracks to hit you with a punch, this preset is a game-changer. By boosting the low-end and mid-range frequencies, it makes your music sound louder and punchier, perfect for genres like rock.
Example: Imagine listening to a rock song on Spotify without the Loudness preset. The sound might feel a bit flat and lacking in intensity. However, by applying the Loudness preset, the low-end and mid-range frequencies are boosted, resulting in a more vibrant and energetic sound that truly packs a punch.
Spoken Word:

Not only for music, but this preset is also a boon for podcast lovers. It brightens up speech and enhances intelligibility. With a significant boost in specific frequencies, it ensures that every spoken word captivates your attention.
Setting Up Spotify on iOS & Desktop (Mac and Windows) for AirPods
Accessing and adjusting the Spotify equalizer for AirPods is a simple process that can be done on both iOS and Android devices. Let’s go through the steps for each platform:
For iOS devices:
- Open the Spotify app on your iOS device and go to the Home page.
- In the top right corner, you’ll find a gear icon. Tap on it to access the settings menu.
- Scroll down and look for the “Playback” option. Tap on it.
- Within the “Playback” settings, you’ll find the “Equalizer” option. Tap on it to enable and access the equalizer settings.
For Android devices:
- Open the Spotify app on your Android device.
- Tap on the gear icon, typically located in the top right corner, to access the settings menu.
- Within the settings menu, you’ll find an option called “Audio Quality.” Tap on it.
- Under the “Audio Quality” section, you’ll see the “Equalizer” option. Tap on it to enable and access the equalizer settings.
For Desktop (Mac and Windows):
- Open the Spotify app on your desktop.
- Look for the profile icon in the upper right corner and click on it.
- In the dropdown menu, find and click on the “Settings” option.
- Scroll down the settings menu until you find the “Playback” section.
- Within the “Playback” section, you’ll see the “Equalizer” option. Make sure it is enabled.
It’s worth mentioning that Spotify’s built-in equalizer provides basic adjustments for audio frequencies.
However, if you’re looking for more advanced EQ customization options, there are third-party apps that offer additional features. Here are a few examples:
Boom 3D (iOS, macOS, Windows, Android): Boom 3D is an advanced equalizer app that provides a 3D surround sound experience, customizable EQ settings, and a wide range of presets for different genres. It also features a built-in audio player that supports Spotify integration.
eqMac (macOS): eqMac is a free equalizer app that works with any audio source, including Spotify. It offers a 10-band equalizer, presets, and advanced audio routing options.
Wavelet (Android): Wavelet is an app that offers customizable EQ settings, presets, and advanced features like bass boost, virtualizer, and reverb. It is compatible with Spotify and other music apps.
Please note that the availability and features of third-party apps may vary depending on the platform and device you’re using. It’s always a good idea to check the respective app stores for more information.
Conclusion:
Congratulations! You’re now equipped with the knowledge to unlock the full potential of Spotify’s equalizer settings and make your AirPods sing like never before. Remember, these settings are just a starting point—feel free to experiment and unleash your creativity. Enhance the bass, bring out the instruments, or add clarity to vocals. The power is in your hands!
So, turn up the volume, close your eyes, and let the music transport you to new dimensions. Immerse yourself in every beat, every melody, and every emotion. It’s time to experience music the way it was meant to be heard—exhilarating, immersive, and utterly captivating. Happy listening!